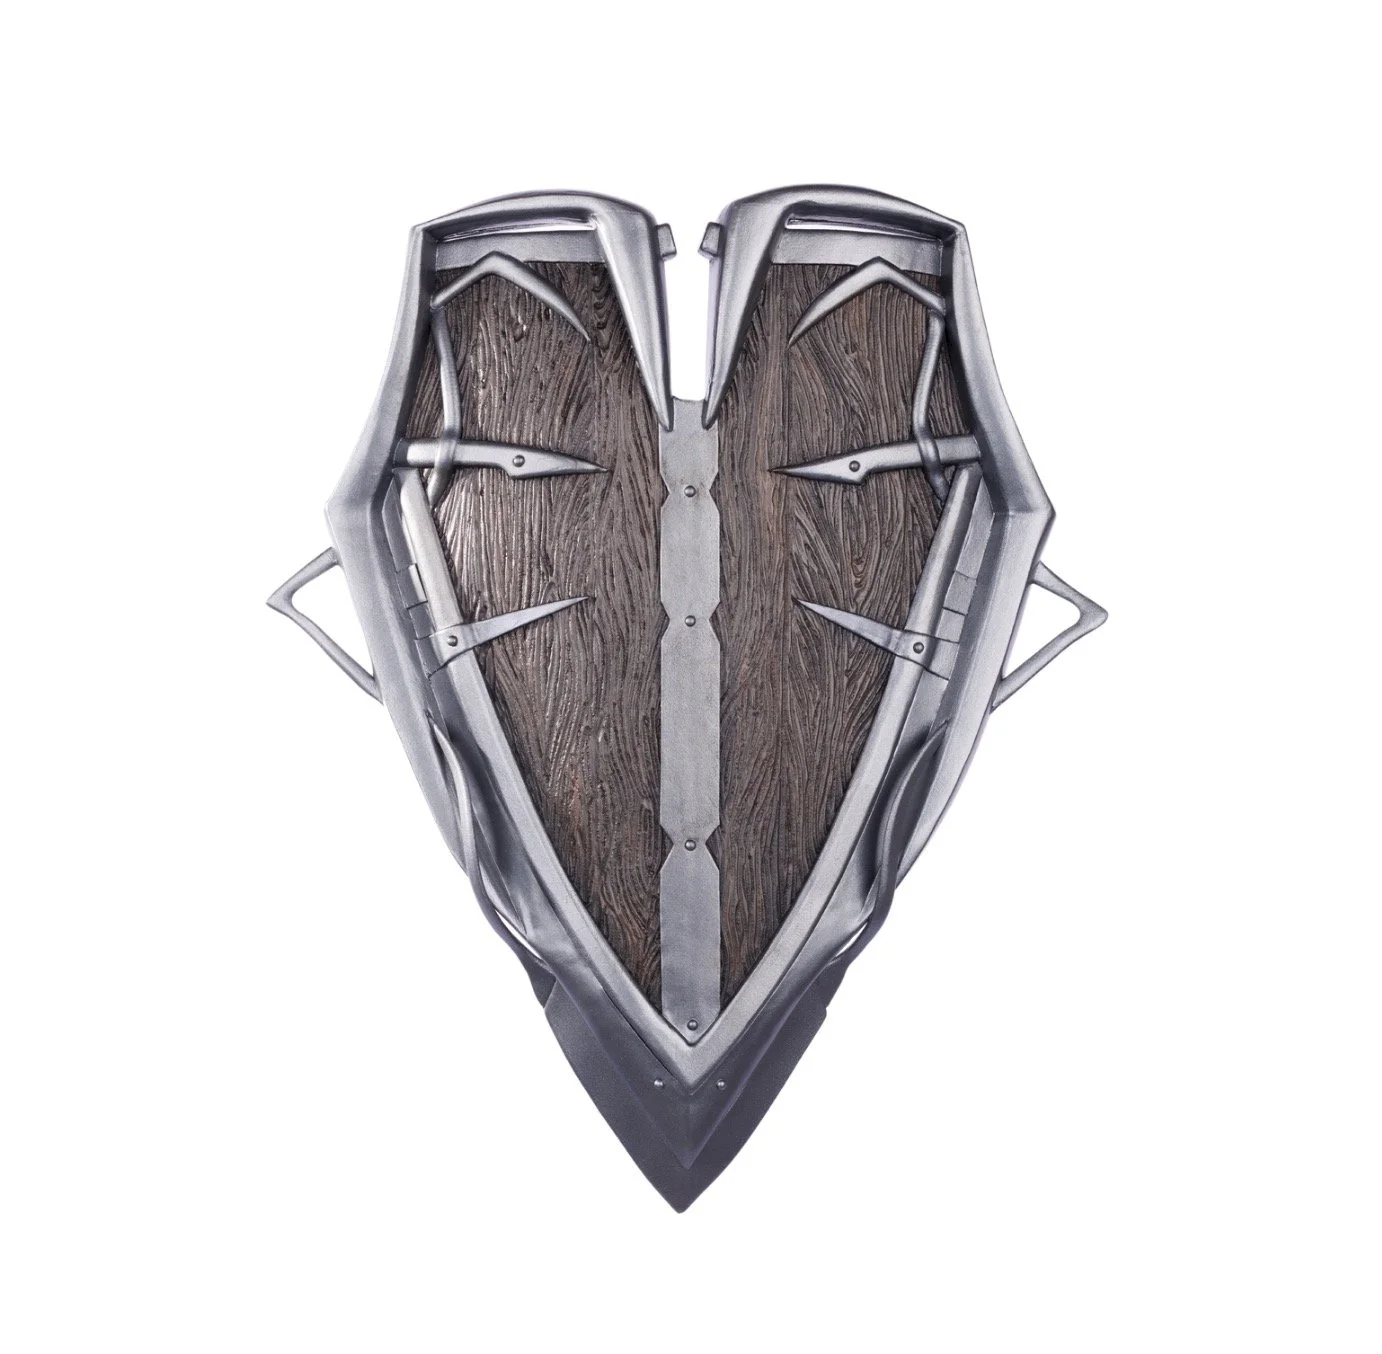


Lae’zel Costume
This project was sponsored by Plasti Dip
A very special thanks to Plasti Dip, who generously sponsored this project!

I used their new line of Craft products for this project. The silver Armor color was just what I needed, and the coverage is incredible. I will share my tips and tricks for working with this amazing line of flexible rubber paint throughout this write-up.
(As of this article being published), the Plasti Dip Craft line is sold exclusively online at https://plastidip.com/product/plastidip-craft/ with free shipping! Check it out for current pricing, shipping details, etc.


Costume Templates for DIY Makers!

Half-Scale Patterning
To get started with patterning, I decided to utilize my half-scale body form (provided by Beatrice Forms). This enabled me to work quickly! I knew I wanted to use 4mm EVA foam for my final armor, so that meant that I could use 2mm eva foam for the 1/2 scale pattern mockup. Trust the math! This part is always fun for me. I love using the small form to manually design each element and layer.

First I covered my mini-dress form with cling wrap and masking tape. This was done to protect the form.

Next I used a combination of foil and more masking tape to begin blocking the shapes and pieces.

As I designed and layered, I tried to keep scale in mind. This step required a lot of revision and edits. This part of the design always takes me the longest time.

Once the lower layers are done, I can design the outer layers. Pro Tip: Always work from the inside to the outside when designing with layers in mind.

Once each layer is done, I cut them out and transfer them to sturdy cardboard paper.

Then I can cut each part out. These pattern pieces can then be scaled up by 200% (I am using a document scanner) to create the full-size version.
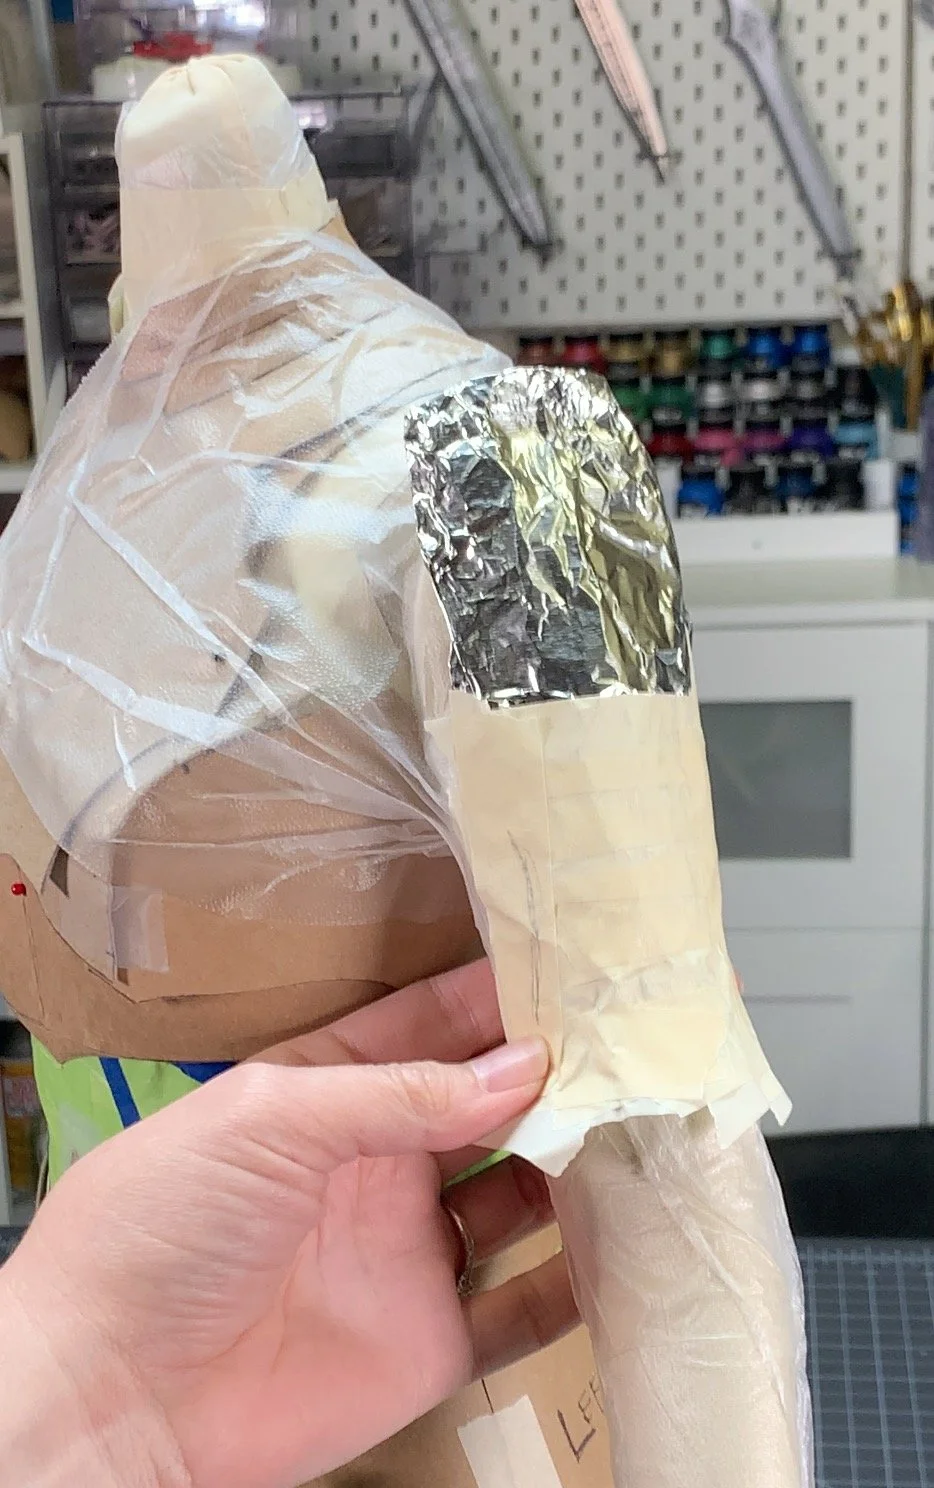
I used the same cling wrap-masking tape-foil patterning technique to pattern the pauldrons, starting with the base pauldron.

After trimming the masking tape-foil pattern.

The cardboard pattern, labeled

I realized the pauldron has a slight flair at the bottom edge, so I used scissors to adjust the pattern.

I continued this process for all of the other pattern pieces: masking tape/foil pattern, transfer to cardboard, trace to 2mm EVA foam. Here you can see that I digitized this pattern and used the print out to trace the shape to EVA foam.

Here is the final half-scale mockup!
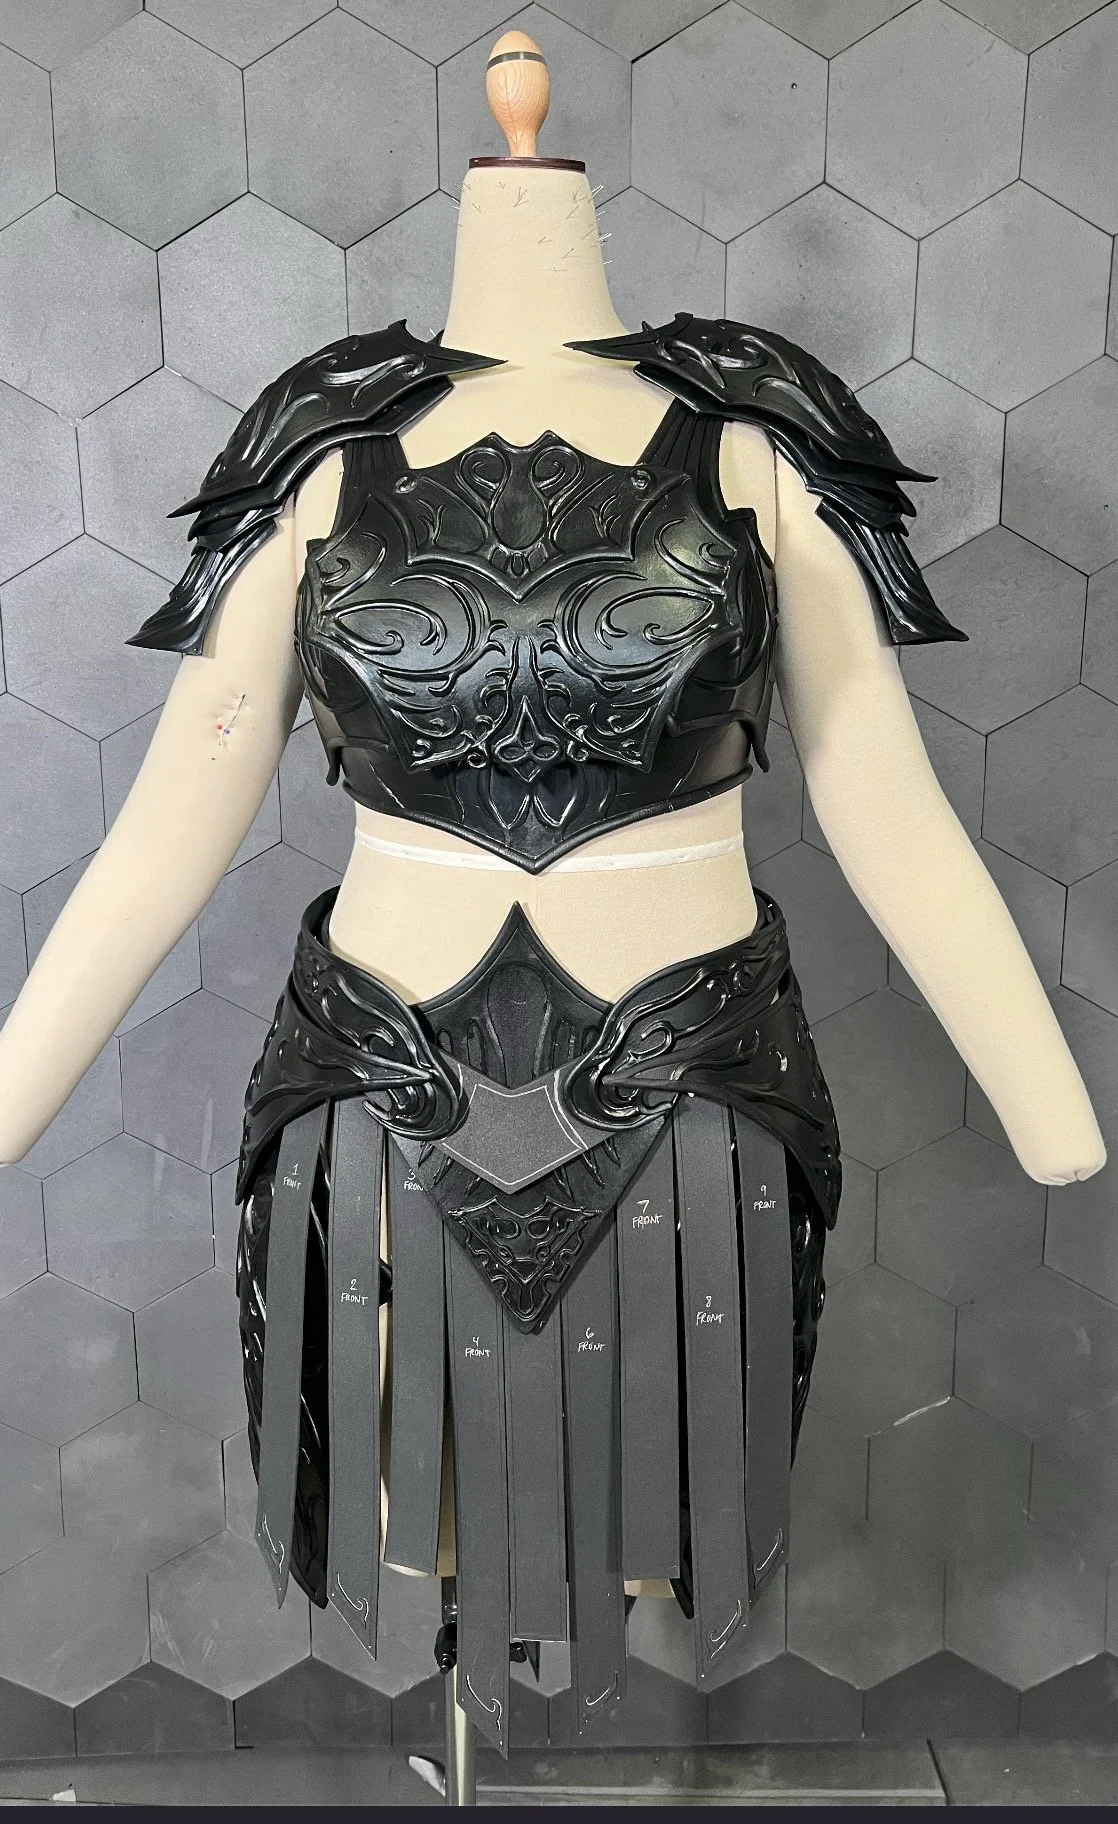
Making the Full-Scale Base
To create the full-scale pieces, I scanned the half-size patterns into my computer and digitized them using Adobe Illustrator. Then I printed out the patterns at a 200% increase (to account for the upscaling needed between my half-size and full-size form) and transferred the pieces to 4mm EVA foam. Then I glued the pieces together using contact cement. Always use a respirator with organic-vapor cartridges and gloves when using contact cement, and work in a well-ventilated area. I chose to glue everything outside for the least amount of exposure to the fumes.

When using contact cement to glue EVA foam, always wear PPE (gloves and organic-vapor rated respirator and cartridges)

Notice the glue lines and the offset edges. This is the initial stages of the full-size mock up so I'm not worried about these in the slightest. There is plenty of time to address these small issues later in the build, after I figure some of the other details out!

This stage is also the place where I think about how I will get in and out of the costume. This is the top bodice piece that I decided will zip together in the back.

This is already looking so great! With the half-body form, the patterning process was a breeze!

Pretty happy with how this all came out, although I made a mistake when I cut a beveled edge for the center seam. When I glued it together, it created a pronounced area that I did not like. I ended up taking this apart and flattening the edges for a smooth seam.

You can see the zipper under the back panel. I decided this will be easy to hide with a detail overlay piece and some velcro.

The mini and the full, side by side. It's such a neat feeling to see these next to each other!
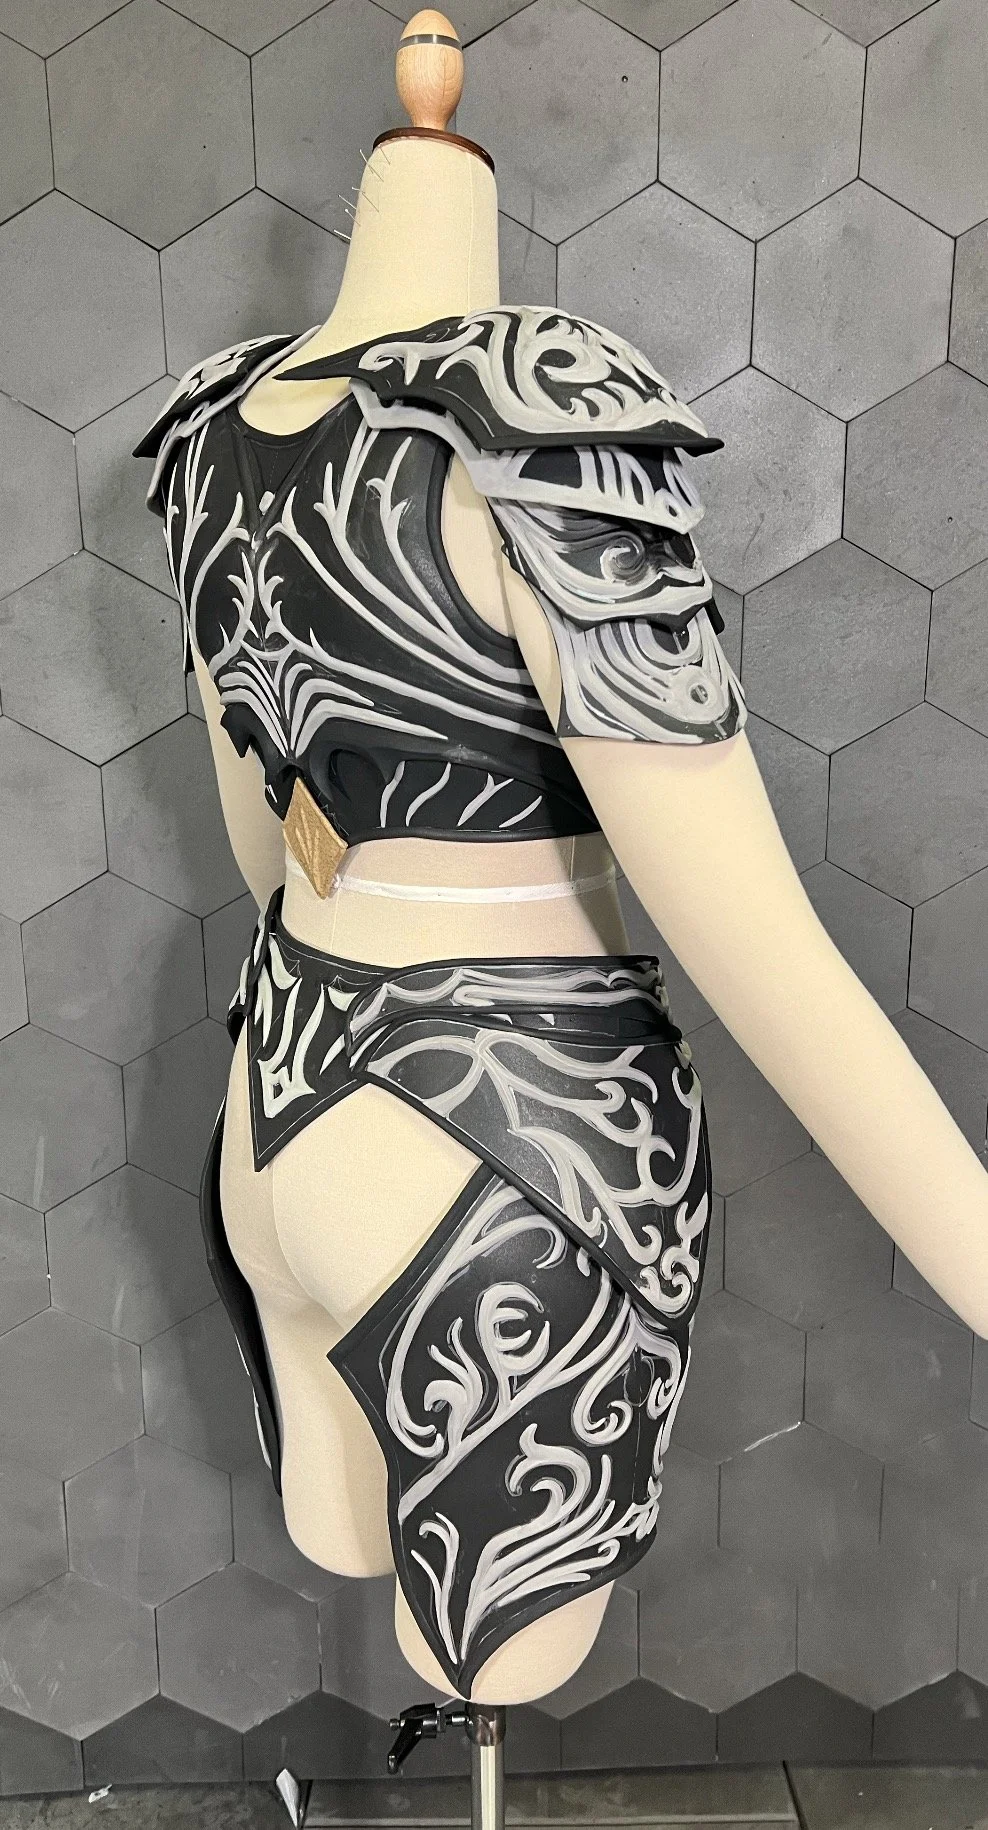
Chest Armor
To refine the chest armor, which is the focal piece of the entire costume, I wanted to make sure I had a good plan for comfort, fit, and design before adding the overlays.

I extended the back portion of the base to better fit underneath an overlay panel, and to include elastic strapping to help keep this piece in place.

A criss-cross strapping system will ensure the straps will not slip over my shoulders.

The overlay piece is laced in the front using elastic lacing and small D-rings. This helps me get in and out of the costume, as well as make the bodice more comfortable.

The elastic has a little stretch, which helps me breathe and move even when it is laced tightly.
Making Undercuts
The chest layer has these raised lines that I wanted to create using undercuts. Undercuts are a simple yet effective way to make these kinds of details without disturbing the surface of the EVA foam. In hindsight, I should have made the overlay piece a little larger to account for the width that would be subtracted during the undercut process. But it still fit, so I got away with it!

Undercuts are a simple yet effective way to make these kinds of details without disturbing the surface of the EVA foam.

First I masked the area and used contrasting tape to place the lines where I wanted them to be.

Next I covered the area with more tape, but making sure I could still see the design underneath.

Then I traced the pieces to cardboard and cut them out to make a template.

I used the template to draw the lines on the INSIDE of the EVA foam.

Next I used my utility knife to carefully remove the material, following along with the lines. I cut the material using a reverse bevel, which created a v-shaped channel along the lines, being very careful not to puncture through to the front side of the EVA foam. This part was hard!

Next I used Surebonder Cosplay Stiks hot glue. I placed a thin bead of glue inside the channel and pressed the sides of the channel together. Always allow the hot glue to fully cool for the best adhesion.

The result of this process creates a "V" shape in the EVA foam.

On the outer side of the piece, the lines are smooth and subtle, just like the reference photo! I will need to be careful with heating this piece with my heat gun so as not to disturb the hot glue.
Breastpiece Overlay
The breastpiece overlay was the last piece to create on the upper torso. This piece would be held in place with hook and loop tape. I embedded floral wire into the edges to help support a curved silhouette. This is a technique that I LOVE using for lightweight solutions to defy the laws of gravity and physics with a costume.

I needed the breastplate to have a curve to fit against my chest, so I embedded floral wire around the edges and covered it with 2mm EVA foam.

I used superglue to place the wire in the groove, and contact cement to attach the thin EVA foam around the edges.

The result is a flexible and poseable piece!
Detail Overlays: Drawing
I covered each piece with cling wrap and masking tape, and drew the overlay design in pencil. Then I filled out the shapes with black marker, leaving room for the gem placements.


Detail Overlays: Stenciling
At first, I thought that I’d carve the overlays by hand... and then I remembered how small those details are and decided to use EVA foam clay instead. My only concern with using EVA foam clay is how delicate it can be when fully cured. But I have a plan for adding some strength to the foam by adding a few layers of Flexbond before painting. But that’s in a later step. For now, please appreciate the intricate and huge amount of detail work that is on every single piece of this armor.

I digitized the stencils and used my laser cutter to create the stencils. You can also use a utility knife or scissors to do this step!


I ended up using a silver sharpie for most of the stencils.

Every piece has its own design. This is going to be a LOT of sculpting work, but it will be beautiful.
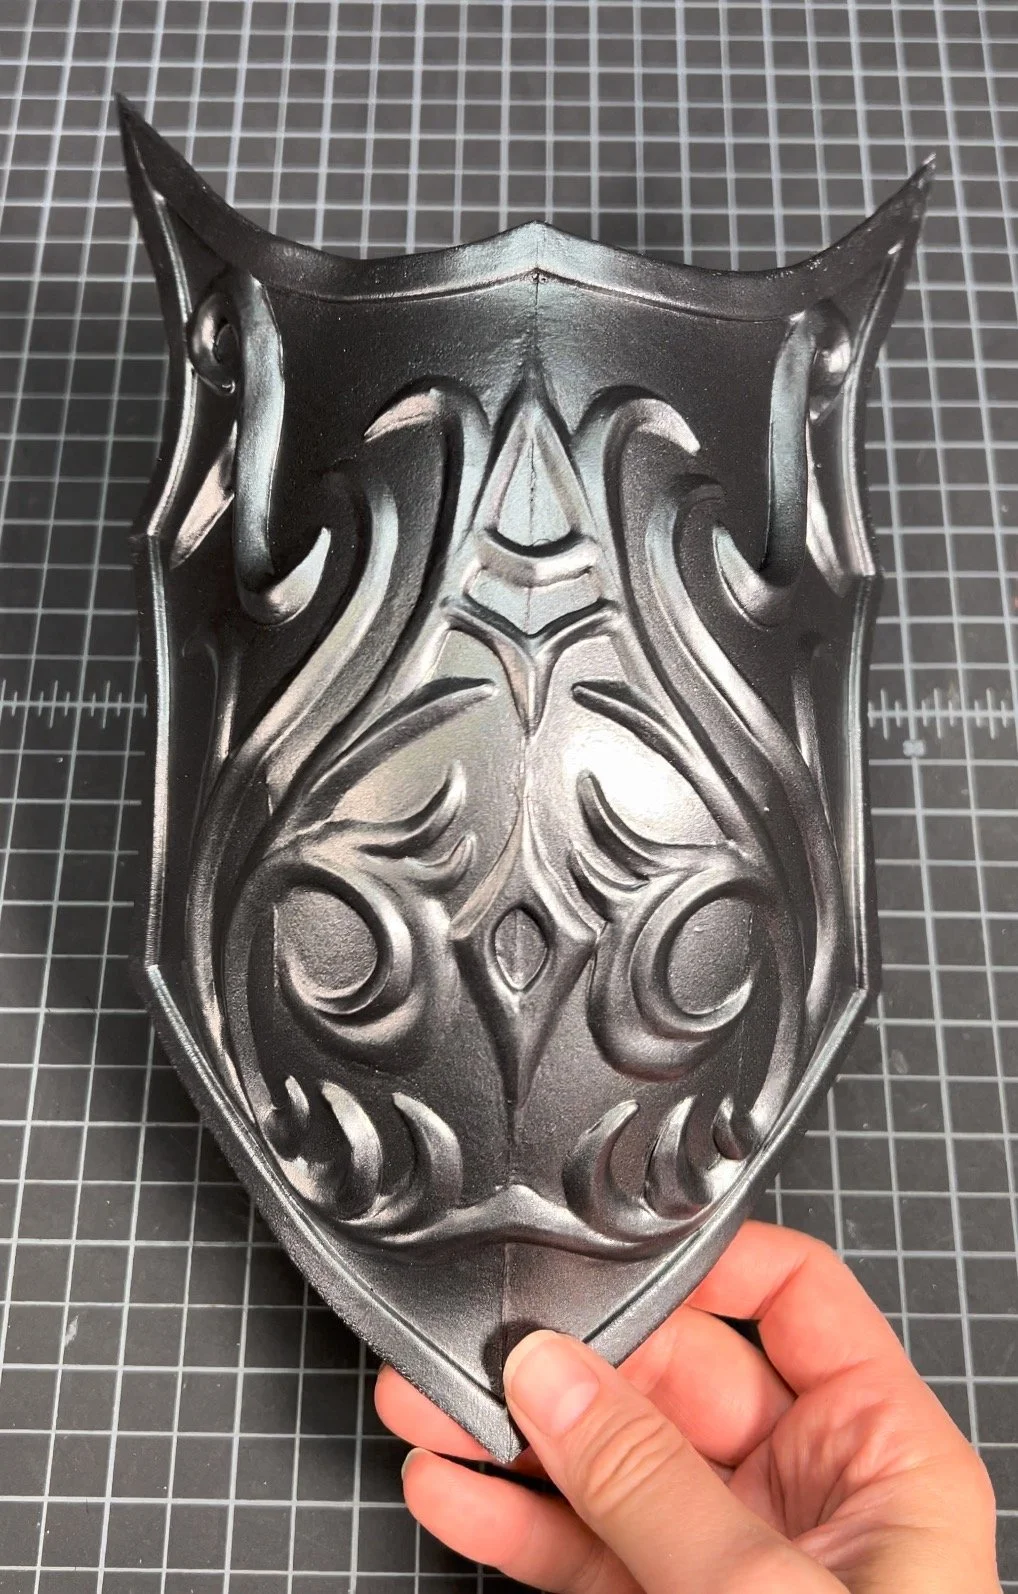
Detail Overlays: Sculpting
EVA foam clay worked very well for this part of the project but HOLY HECK it took a long time to hand sculpt. The bonus is that the pieces will remain flexible and are lightweight! This is the process to use to add EVA foam clay to EVA foam. No glue is needed - just water, and lots of it as you work!

I used just one tub of this EVA Foam Clay for my entire costume!

First I roll a ball of clay and divide it equally into two balls.

Then I make two long noodles that are the same length and size. This is for symmetry on the left and right sides.

Dip a finger into water

And wet the surface of the EVA foam where the clay will be placed.

Position the clay noodle on the EVA foam, over the wet area

Gently press the clay against the EVA foam to promote adhesion

Add more water and begin sculpting the clay as desired

Add water more often than you think!

For the best symmetry, I got great results by working on the right and left sides in the same areas at the same time, using the same amount of clay and sculpting technique.


Floral Wire
I had a problem, which I often have because I typically use 4mm EVA foam for armor. A large piece like this thigh armor has multiple shapes that I want to maintain around my leg. Without an internal support, the EVA foam will not stay around my leg, no matter how many straps I use. I could have tried gluing strips of eva foam to the inner side of the pieces, but that may have added bulk and might also be visible. So, I opted for this easy solution instead. This is my favorite way to add shape to thin armor.

Left: Before installing wire Right: After installing wire

I used this engraving bit to create a channel in the EVA foam to embed floral wire.

I worked slowly and carefully so I didn't break through the entire thickness of EVA foam.

Pro tip: floral wire has a coating that can be lightly sanded away. This helps glue adhere to the metal.

I'm using CA glue to attach the wire inside the engraved channel.

The finished piece, with wire glued around the entire periphery. Pro tip: gluing the wire to the piece while it is formed into the curve that you desire will help it maintain the final shape.
I added contact cement to the outer layer of the wire and covered it with a 10mm EVA foam half dowel from Coscom Cosplay Supplies.


The piece is still very flexible and can be manipulated into position.

The finished piece will maintain a great curve against my leg with minimal need for straps.
Priming
After a tremendous amount of work, the pieces are ready to prime! I decided to use a combination of Flexbond and black Hexflex. I painted two layers of this mixture on every piece and allowed it to fully cure before painting with Plasti Dip.
Here’s why I used an additional product before jumping straight to Plasti Dip:
EVA Foam clay is less durable than sheets of EVA foam. This means that there is a chance the clay will crack if overly stressed. The additional primer will add durability.
The clay is light grey, and the EVA foam is black. I want an even color when I paint with Plasti Dip to avoid any shine-through of the lighter grey color.
The Flexbond/Hexflex mixture will settle into small gaps. This will help promote a better surface for the Plasti Dip.
Flexbond is a shiny/satin finish when dried. This will allow the Plasti Dip Armor color to be even shinier - and even prettier.
Here are a few other products I could have used for this process: Mod Podge, CosFlex, Plaid FX, Leather Paint, or any acrylic paint mixed with Fabric Medium at a 1:1 ratio. I used Hexflex and Flexbond because that was available to me at the time.
You may notice a tan-colored material on the back of the costume, and a teeny bit of it on the front. This is MTP thermoplastic! I decided to use something a bit more durable than EVA foam clay to create these details. The piece on the back will have hook and loop tape adhered to it, so it needs to withstand wear and tear. The front is a small detail that hangs off the chestpiece. To avoid this small piece from being damaged, I heat-formed some thermoplastic and superglued it in place.


Plasti Dip!
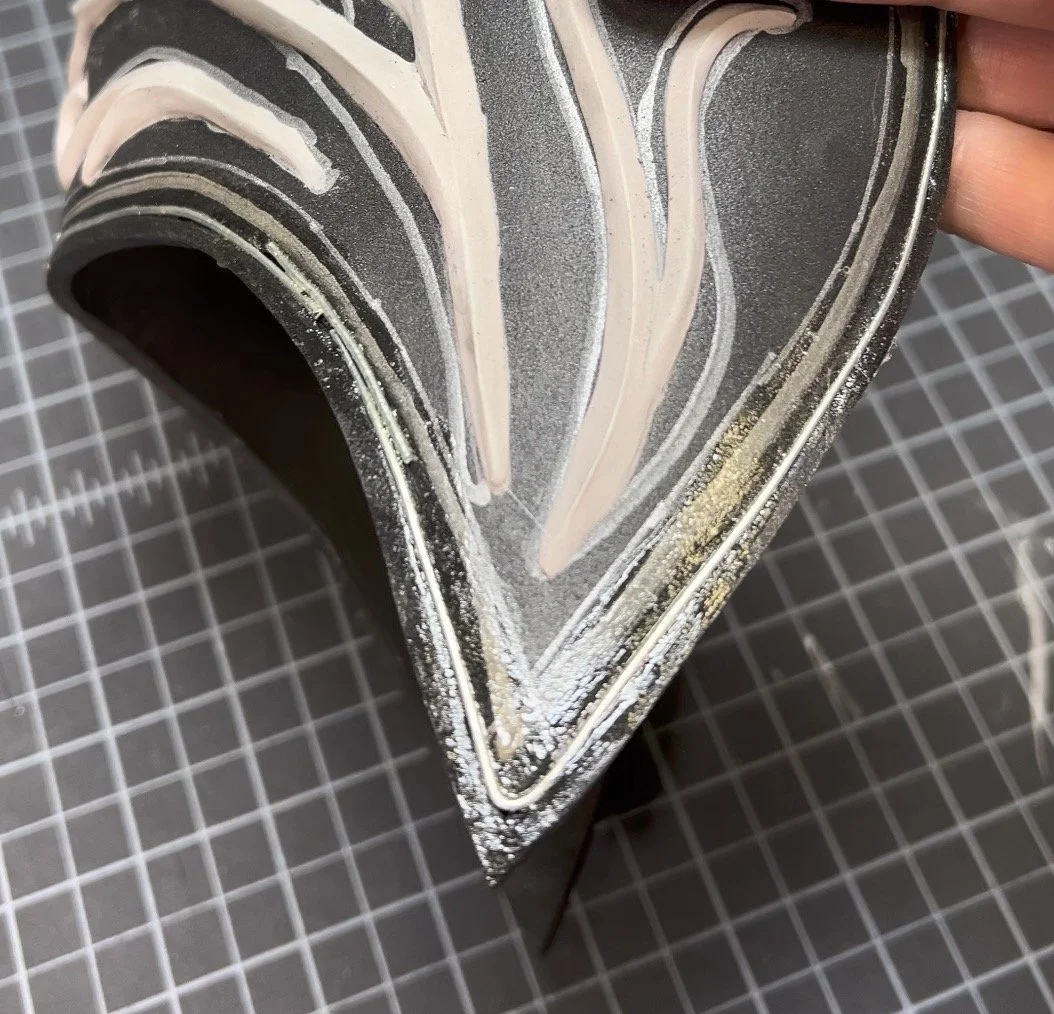
For the silver color, I sprayed several layers of Plasti Dip Craft (Armor Color). Look at that shine!
Here is my process for good results when using Plasti Dip:
Spray outside, or in an area with very good ventilation. Always use proper PPE (gloves, respirator).
Place the can in warm water for 15 minutes before spraying.
Shake the can for the recommended amount of time, and frequently when spraying.
The first layer should be thick enough to have a wet, shiny appearance. Additional layers won’t need as much paint, but should also have a shiny, wet surface.
Wait 30 minutes between coats.
Allow to fully cure before handling.
Pro Tips: Follow the directions! You’ll have the best results when you use it during optimal humidity and temperature conditions. These are printed on the label. Use a weather app to find out what your current conditions are. This is an amazing product when used according to the directions.


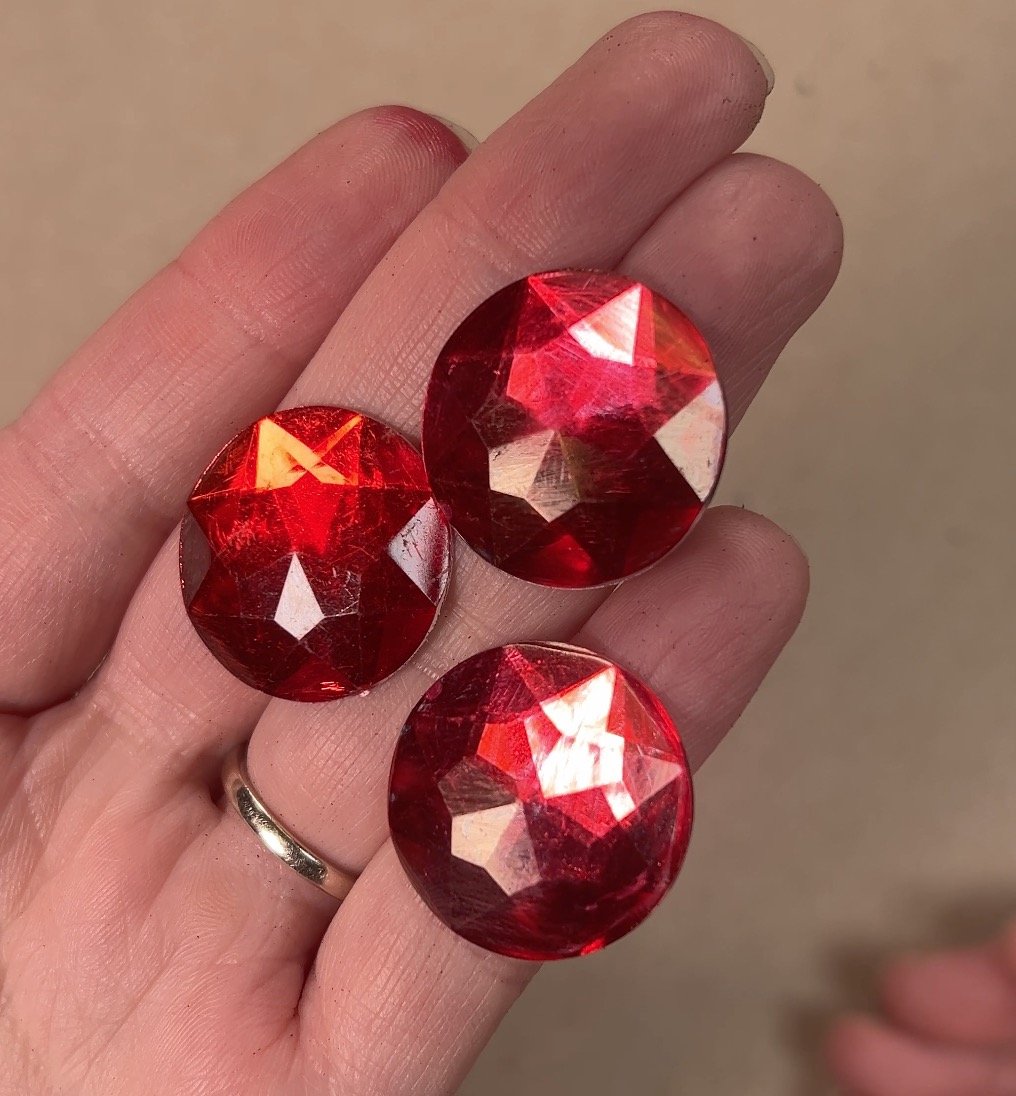
Gems
Instead of molding and casting my gems, I used a very basic and simple (and non-toxic) technique! All I used was a red sharpie marker to change the color of white and light pink gems. This was a cost-effective way to create all the gems I needed for this project. I dabbed a little bit of hot glue to affix each one in place.


Skirt
Ad text here to describe the section. Add images to the gallery if desired. Don’t forget to change the anchor and use the appropriate link in the main menu.

I did this step before I painted with Plasti Dip. It was fun assembling the skirt panels!

I bought some tan vinyl to use for the soft parts.

Eventually I decided to switch to a faux suede which was much softer and easier to sew. It was also the color I wanted, so that saved me a lot of time.

For the small details on each skirt panel, I laser cut 2mm EVA 70, which is a denser kind of EVA foam. I like to use this kind of EVA foam when I have very small details.

I initially thought this would be a fabric piece, but I changed my mind and created it using layers of carved EVA foam, and I laser cut the lower detail for the best symmetry and detail.

..then I changed my mind again and re-created this piece. I covered it with the faux suede fabric and attached EVA foam pieces to the surface. This worked much better and was much cleaner!

I repeated the process for the back part of the belt. I love how this came out.

The finished panels! I hot-glued silver bits and bobs for the details.
Collar, Forearm Wraps, Lower Leg Wraps
I used upcycled leather for the collar, forearm wraps, and lower leg wraps instead of the faux suede material because.. well.. I thought I had enough upcycled leather! I created these pieces before I changed course on the skirt material, and I didn’t want to recreate anything because I was happy with what I already had. In the end, I think you can notice if you’re really looking at it, but from 5 feet away, it’s not a big enough deal to make the change. I am still pleased with how it came out, which is the important thing!

I digitized the half-scale pattern to upscale to the full-scale pattern.

Then I traced and cut out the full-size pieces using upcycled leather.

Next I sewed all the pieces together.

I topstiched the entire piece so it would lay flat, and added some details with hot glue.

The back of the collar was finished with brown bias tape and secured together with hook and loop tape.

I patterned the arm wraps using masking tape and marker.

At first I used the vinyl, but then I switched to upcycled leather.

The lower leg pattern was fairly simple to create using the same masking tape method and patterning around my own leg.

I don't often work with leather, so this was a bit of a challenge to learn. I also didn't have any extra material so I was nervous to sew.

It all came out well! I added a strip of hook and loop tape for the enclosure.

The vambraces needed some additional structure so they would stay flush against my forearms. Here you can see them flaring outwards, which I wanted to correct.

To do that, I hot glued corset boning to the inside along the edge. That did the trick and now they stay in place.
Straps
I had a few ideas for how best to create the straps. Most of the straps weren’t load-bearing or functional, which I did on purpose. The armor is all held together on the belt, and the straps are ornamental. The only exception to this is the leg straps that go around my thigh. Since the leg pieces are already curved and shaped to fit my leg, the straps are there to simply keep the piece from moving around when I walk.

I had already been thinking about where the straps would have to be placed. Here I'm using strips of EVA foam to block out the positioning.

This also helped me make decisions about attachments and how these pieces were going to stay up.

I sewed several long strips of strapping so I could have plenty to play with. after pinning the straps in place I could see where I needed to attach them.

I initially attached the straps to the armor.. which was a mistake! This made it VERY difficult to get in and out of for bathroom breaks.

Later I ended up attaching the straps to the undersuit, which was a much better solution.
Chainmail Undershirt
Instead of making chainmail, I decided to make illusion chainmail! I got this idea from Pretzel Cosplay, who also made this costume! For mine, I used some metallic fabric paint, and created a stamp with 10mm thick EVA 70. The higher shore density of this kind of EVA foam was perfect for maintaining the shape as I stamped hundreds of times on to the leotard. For the sleeves, I cut around the stamped shapes to simulate a chainmail shirt. Easy peasy, comfortable, and washable!


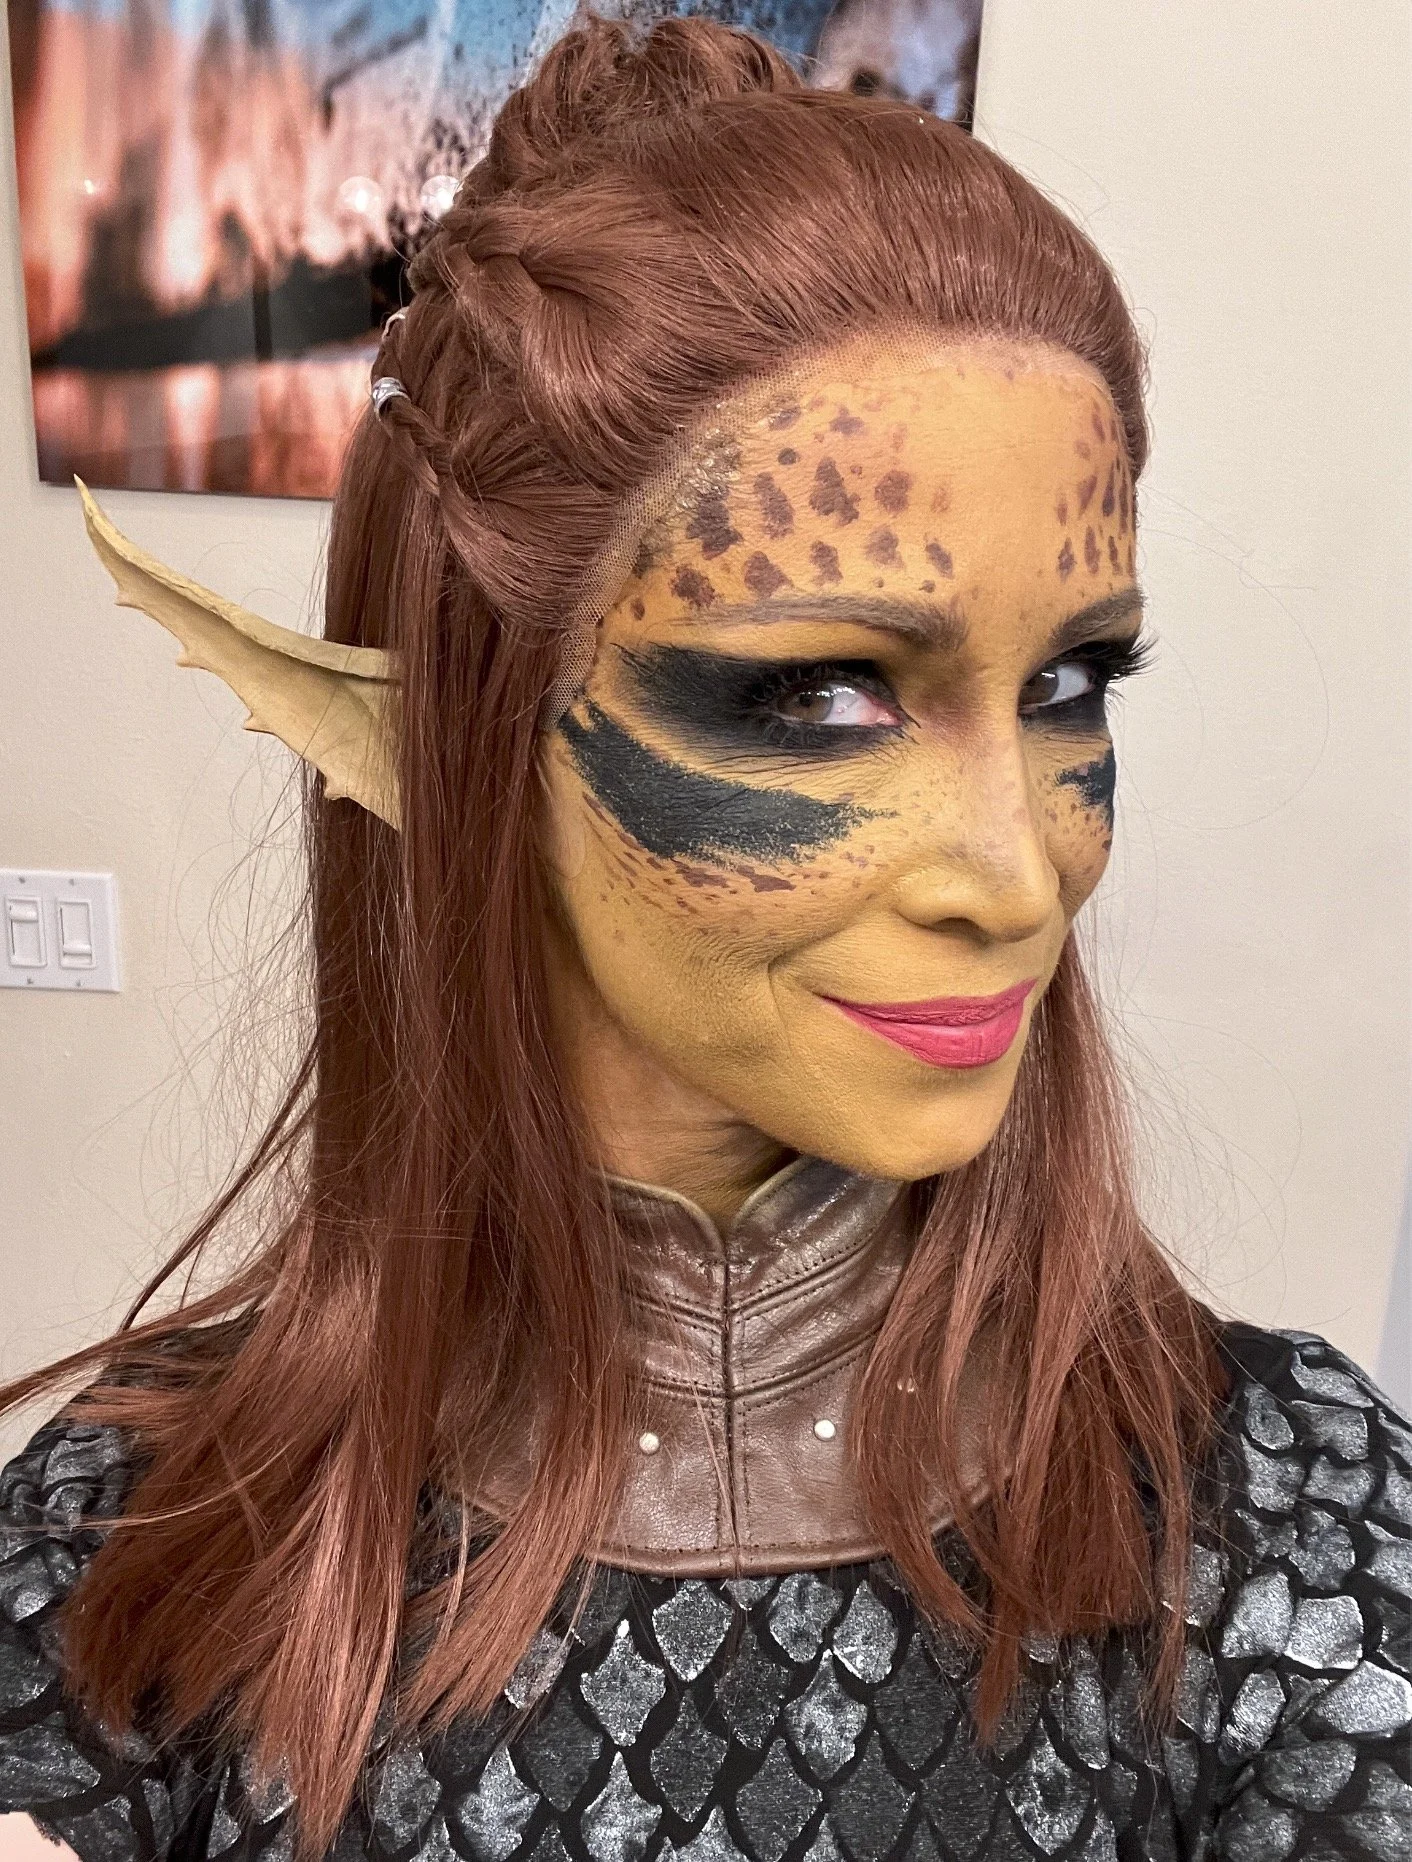
Ears
Lae'zel's Githyanki ears were sculpted on a replica cast of my ears with Chavant modeling clay, molded with Accu-cast plaster, and cast with liquid latex. I used my body paint (a blend of Mehron Paradise in Dijon and Olive) to add color. Thank you to @smoothon and Greg Schrantz for the heavy assist on this project. I am so glad to add this to "things I learned how to do"! You can find the materials used in this video at one of the official Smooth-On distributors like Reynolds Advanced Materials:

Look at those lovely ears! They are very unique, and I wanted to create something similar.

Greg from Smooth-On saved me! He walked me through the process of creating a life cast of my ear. You can watch the video on their YouTube channel - it's a GREAT tutorial for how to do this: https://youtu.be/mt3POWc3-YI?si=IdglBloaWzSci61Z

Smooth-On is such a great resource for molding and casting and beyond. They are a wonderful company and I am so thankful for their help over the years!

Greg walked me through all the steps for making exact replicas of my ears so I could take them home and sculpt Lae'zel's ears on them.

He used Smooth-Cast 300 Q (Resin) to cast the ears.

They came out perfectly!

I used Chavant Contour Clay Medium to sculpt the ears

The ears were long and thin, and so I added some floral wire to help support the clay as I sculpted.

Once the sculpt was done, I used Accu-Cast LiquiStone™ Gypsum Cement to create the molds

This was a very nerve-wracking process. I am used to molding with silicone, which is stretchy and forgiving. Gypsum is hard and so the mold parts need to separate cleanly to avoid locking together.

It worked! I definitely did a happy dance when I opened the mold. I removed the sculpt and prepared for the latex cast.

I learned so many new things - latex needs to have it's moisture removed by the mold in order to dry correctly. This is why gypsum is needed and not silicone -the gypsum will absorb the moisture from the latex, leaving behind a sturdy cast!

It worked - I was SO happy! I think that for the first attempt at this new process, it worked pretty well.

I am very happy with the results! Thank you again to Smooth-On for helping me, and for providing the maker community with a tutorial for making life casts!
Leggings and Arm Socks
To find the right shade for the tights and armsocks, I used RIT's color guide as a starting point (I used "Gherkin") and tweaked the dye recipe a little. Also note that the arm socks and the tights are not exactly the same blend of fibers, so be aware that the dye result will not be the same. You'll have to test and use the force a little :). While there isn't a sewn seam in the armsocks, you'll most likely notice a difference in the dye consistency along the invisible seam.
Material List:
Arm Socks: https://www.welovecolors.com/shop/womens/gloves/long-matte-seamless-gloves-armsocks
Performance Tights: https://www.welovecolors.com/shop/womens/tights/performance-tights
RIT Dyemore for Synthetics: https://www.ritdye.com/type/dyemore-for-synthetics/

I ordered these performance tights in white, and a size larger than I usually wear so they would definitely be opaque. I should mention that the gloves are 95% Nylon and 5% spandex, which is different from the leggings, which are 80% Nylon 20% Spandex. This means the dye will affect the materials differently, and I needed to pay attention.

I ordered these in white so I could dye them. I ended up getting a couple of pairs just in case.

This is the formula I used to dye the performance tights and arm socks.

Always follow the instructions for use and especially for safety!

I followed the formula directions for the first batch

The color came out too bright, so I prepared another dye bath.

I accidentally poured too much of a teal color into the mixture.. so at this point I was crossing my fingers that it was all going to come out okay....

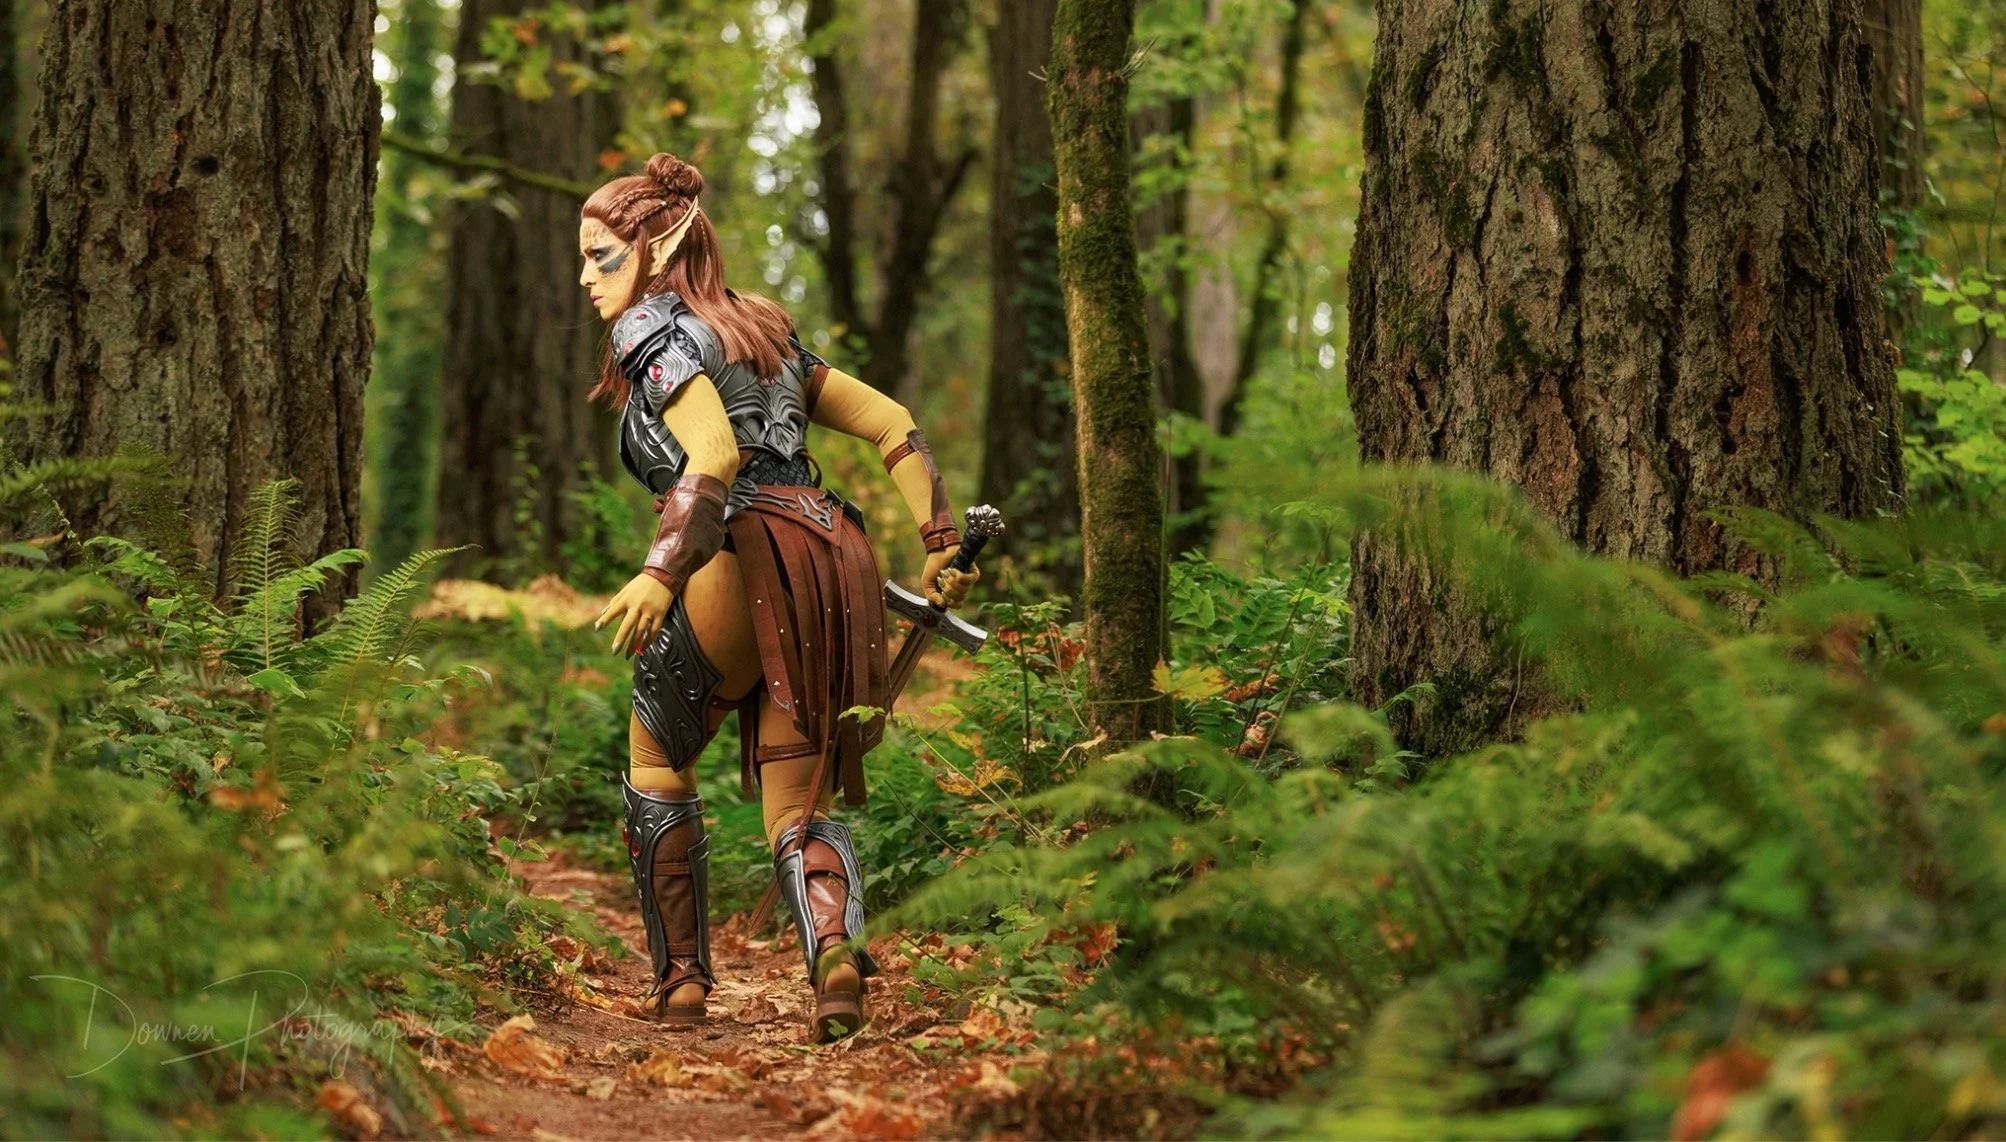
It worked! I was very happy with the result. The color difference between the arm socks and the leggings is minimal, and they spare me the effort of body paint! Image by Brett Downen (Downen Photography)
Makeup
How did I get that Githyanki skin glow? I used Mehron Paradise AQ makeup for my neck and face. To make the right shade of body paint, I combined the Olive and Dijon Paradise colors using a spatula and blended until it was a consistent color. Only then did I apply the makeup using a brush for complete coverage all in one application. Don't forget primer and barrier spray! For the contouring, I used brown, black, and deep purple/reddish brown powders. I haven’t had a ton of experience with makeup, so this was a big learning curve for me.
I matched the color to my tights, instead of the other way around. I figured it would be easier to do this, than try to match dye!
This makeup held up pretty well, but I would like to experiment with alcohol-activated makeup for better durability.
- Mehron Paradise in Olive and Dijon: https://www.mehron.com/paradise-makeup-aq/


Wig
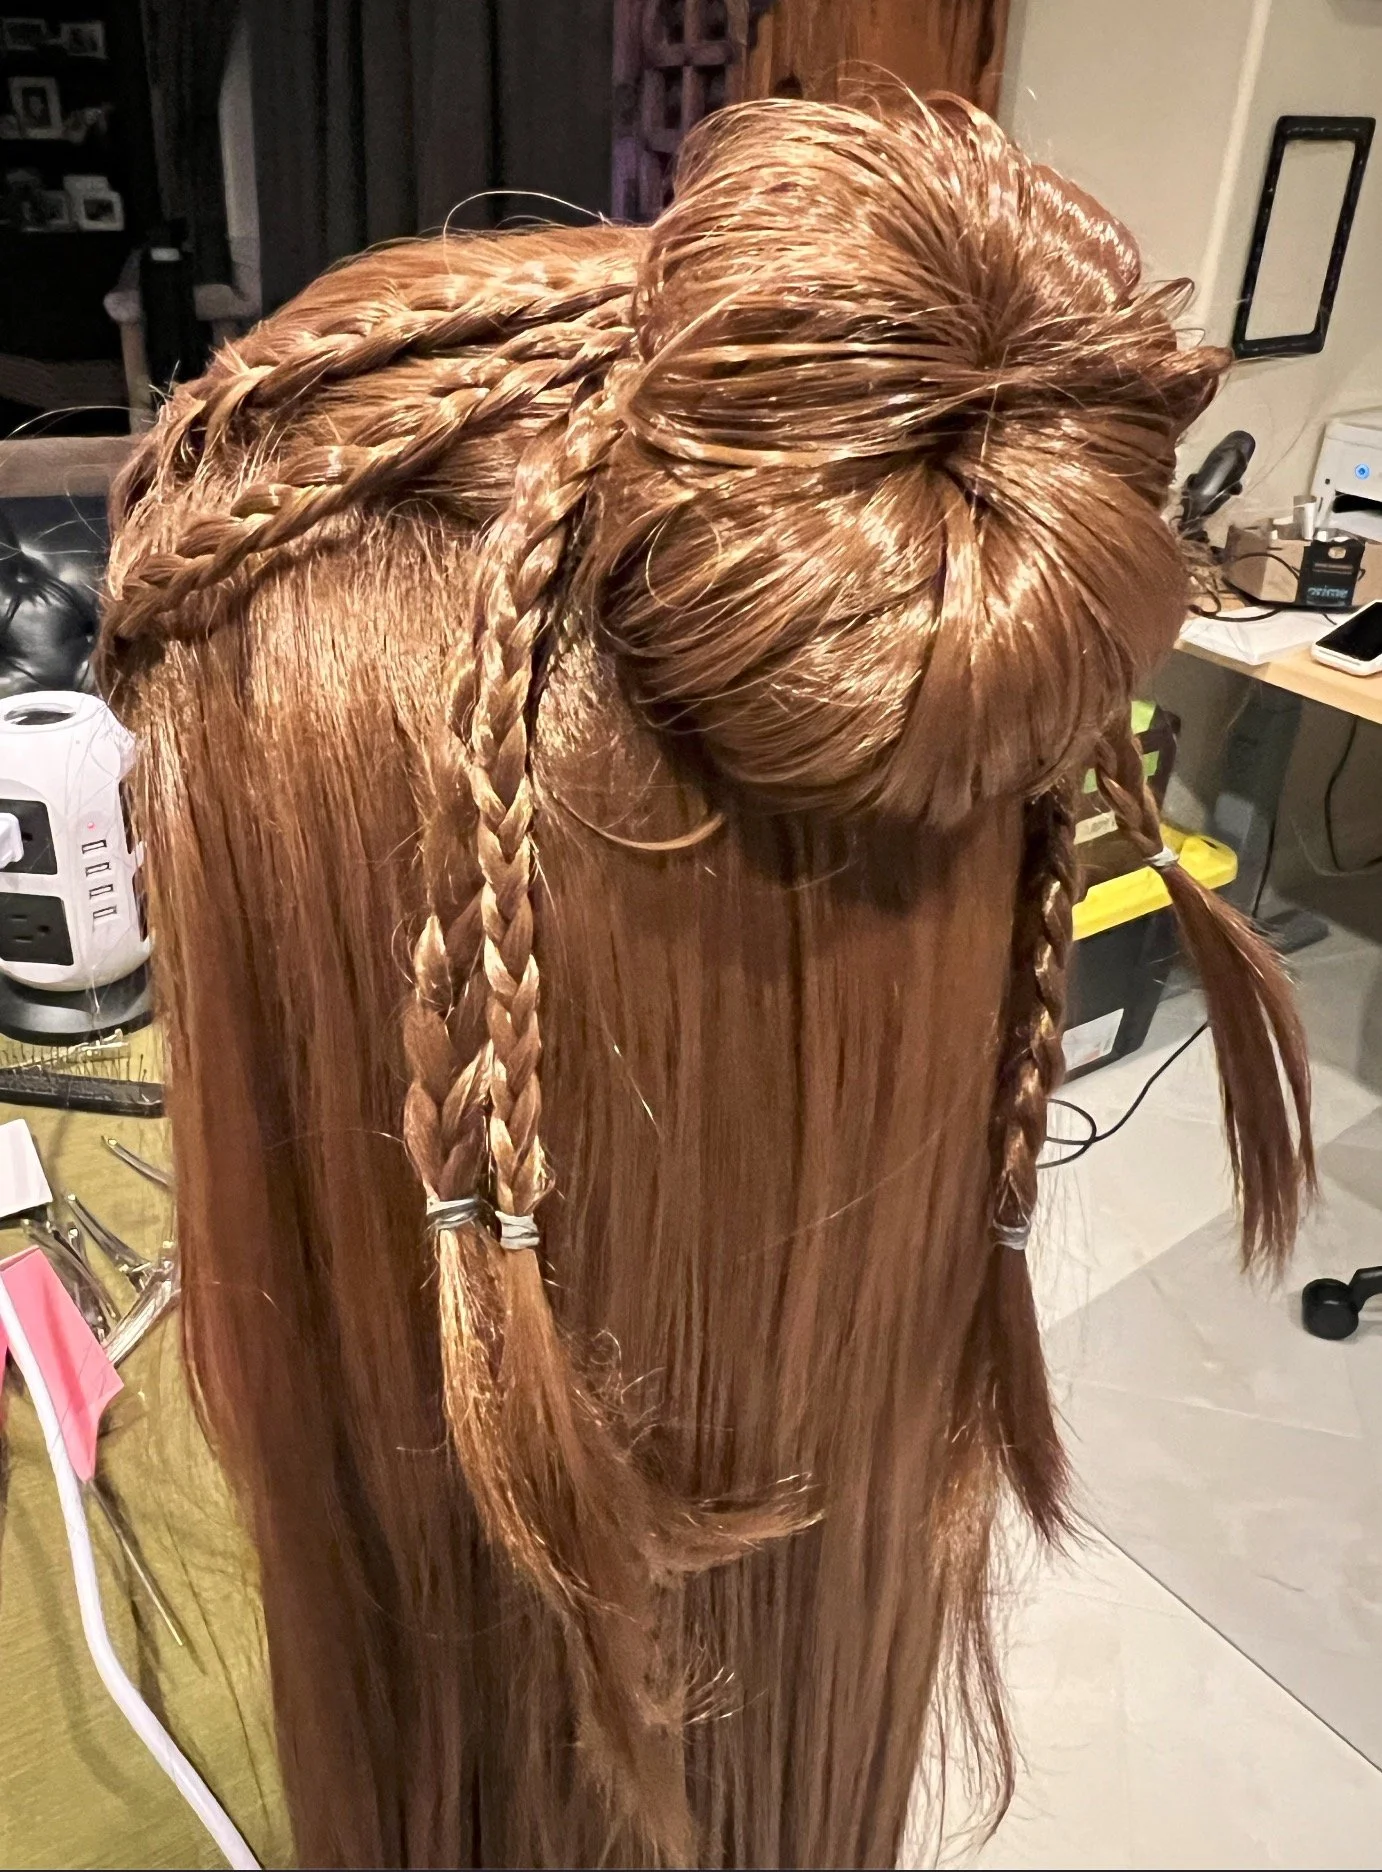
I used this Astraea wig (light brown) from Epic Cosplay Wigs: https://www.epiccosplay.com/collections/wavy/products/astraea-light-brown-wig. I am not the best at styling wigs, so I was relieved that this was a simple style that included some braids and a big messy bun! I have re-styled this wig once already, to clean up the braids and bun.


Final Reveal Photos
My amazing husband took these photos at a park near our house. It was the perfect setting for this character, and the perfect showcase for all the hard work that went into this project. I am so proud of everything I learned and did to bring everything together. It was a hard build, but thanks to the support from Plasti Dip, Smooth-On, Beatrice Forms, Coscom Cosplay Supplies and - most importantly, my husband - it all worked out!

Image © Downen Photography
Image © Downen Photography
Image © Downen Photography
Image © Downen Photography
Image © Downen Photography
Image © Downen Photography
Image © Downen Photography
Image © Downen Photography
Image © Downen Photography
Image © Downen Photography
Image © Downen Photography
Image © Downen Photography
Image © Downen Photography
Image © Downen Photography